1. About This Program
This project is supported by the Fund for Innovative Technology-in-Education (FITE) allocated by the University Grants Committee (UGC). We aim to provide interested students with hands-on learning experience about recent technical breakthroughs on large language models (LLMs). This webpage provides an important platform that works as 1) an active learning community, and 2) a sandbox environment for API-based LLM interactions.
We will periodically update the latest technical evolutions of LLMs on this learning platform. And we have also posted entry-level tutorial materials on the platform to help new learners begin easily. Additionally, discussion and Q&A are highly welcomed within the community.
Further, the platform also provides users with a sandbox environment where they can experience LLM programming via an API so that they can gain hands-on LLM programming experience without the need for expensive GPUs or a complex local environment setup.
2. Technical Sharing
3. Llama Tutorial
3.1 Deployment
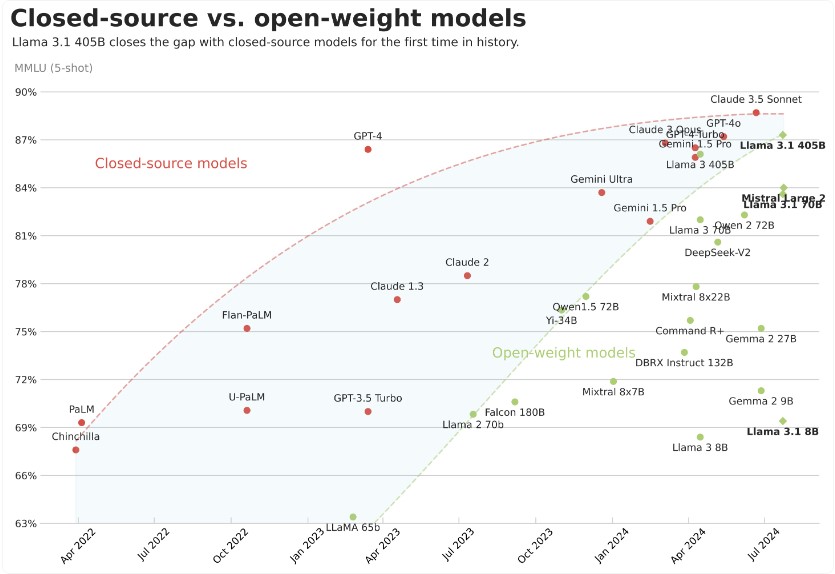
LLaMA 3 (Large Language Model Meta AI 3) is the third generation of large language model developed by Meta (Facebook). It is an advanced model based on deep learning and artificial intelligence technology, designed to generate high-quality natural language text. LLaMA 3 is commonly used in various natural language processing tasks, including text generation, translation, question answering, text summarization, etc. As an upgraded version after LLaMA 2, it has improved performance, efficiency and processing power, and can better understand and generate complex language structures.
The LlaMA3 series model group supports 8B and 70B pre-trained versions, and is open source for everyone to use. In the following tutorials, we will deploy and use the dataset to fine-tune the LoRA of llaMA3-8B.
<1> Deploy and Run on Linux
With a Linux setup that has a GPU with at least 16GB of VRAM, you should be able to load the 8B Llama model in fp16 natively. If you have an Nvidia GPU, you can confirm your setup using the NVIDIA System Management Interface tool, which will show you what GPU you have, available VRAM, and other useful information,
by typing: nvidia-smi
to view nvidia's VRAM configuration.

<2> Get llama3 Weight
Visit the llama website, fill in your details in the form, and select the model you want to download.
Read and agree to the license agreement, then click Accept and Continue. You will see a unique URL on the website. You will also receive the URL in an email, which will be valid for 24 hours and allow you to download each model up to 5 times. You can request a new URL at any time.
Now, we are ready to get the weights and run the model locally on our machine. It is recommended to use a Python virtual environment to run this demo. In this demo, we use Miniconda, but you can use any virtual environment of your choice. In addition, please refer to the configuration instructions of miniconda:

Open your terminal and create a new folder called llama3-demo in your workspace. Navigate to the new folder and clone the Llama repository:
mkdir llama3-demo
cd llama3-demo
git clone https://github.com/meta-llama/llama3.git

For this demo, we need to install two prerequisites: wget and md5sum. To confirm if your distribution has these, use:
wget --version
md5sum –version
It should return the installed version. If your distribution does not have these, you can install them with the following commands:
apt-get install wget
apt-get install md5sum
To make sure we have all package dependencies installed, in the newly cloned repo folder enter:
pip install -e

Now, we are ready to download the model weights for our local setup. Our team created a helper script to make it easy to download the model weights. In your terminal, enter:
./download.sh
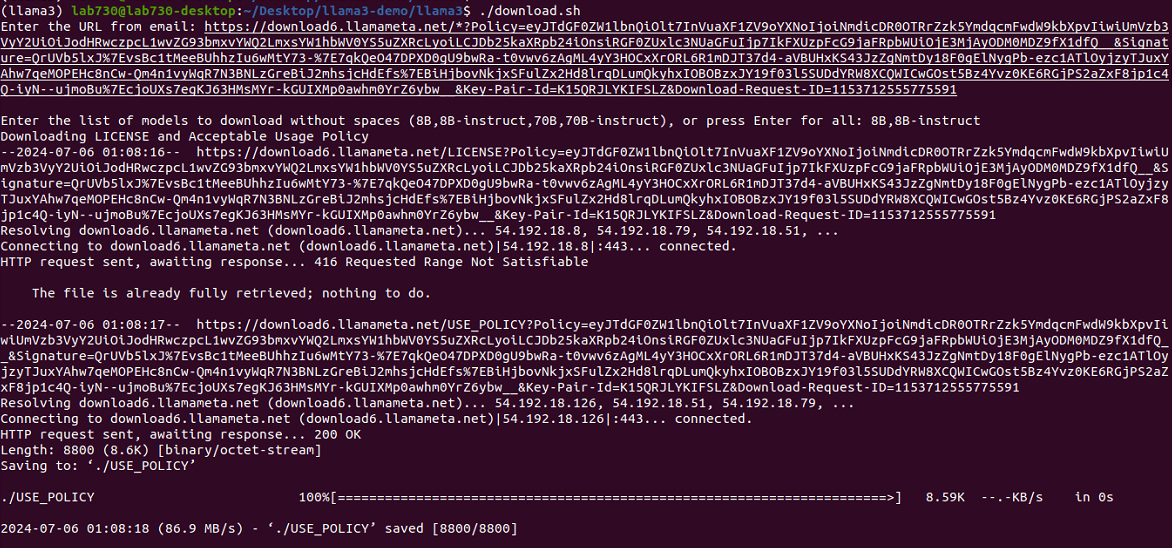
The script will ask you for the URL from your email. Paste the URL you received from Meta. It will then ask you to enter a list of models to download. In our example, we will download the 8B pretrained model and the fine-tuned 8B chat model. Therefore, we will enter "8B,8B-instruct".
<3> Running the Model
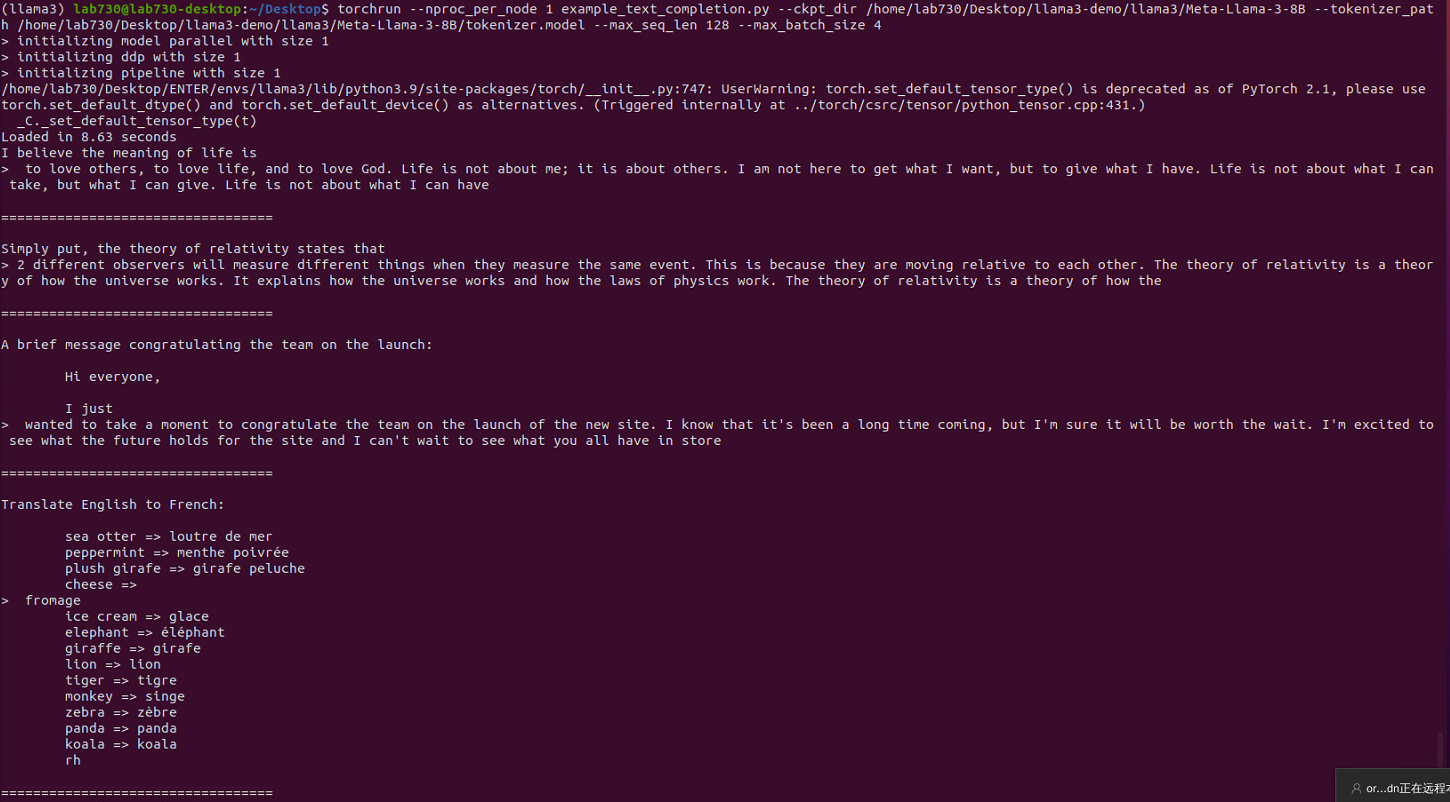
We are ready to run an example inference script to test that our model is setup correctly and working properly. We can use an example Python script called example_text_completion.py to test the model.
To run the script, return to our terminal and type in the llama3repo:
torchrun --nproc_per_node 1 example_text_completion.py
-ckpt_dir Meta-Llama-3-8B/
-tokenizer_path Meta-Llama-3-8B/tokenizer.model
-max_seq_len 128
-max_batch_size 4
Replace Meta-Llama-3-8B/ with the path to your checkpoint directory and tokenizer.model with the path to your tokenizer model. If you run it from this main directory, the paths may not need to be changed.
Set –nproc_per_node to the MP value for the model you are using. For the 8B model, this value is set to 1.
Adjust the max_seq_len and max_batch_size parameters as needed. We set them to 128 and 4 respectively.
<4> Trying out and Improving 8b-instruct
To try out the fine-tuned chat model (8B-instruct), we have a similar example called example_chat_completion.py.
torchrun --nproc_per_node 1 example_chat_completion.py
-ckpt_dir Meta-Llama-3-8B-Instruct/
-tokenizer_path Meta-Llama-3-8B-Instruct/tokenizer.model
-max_seq_len 512
-max_batch_size 6
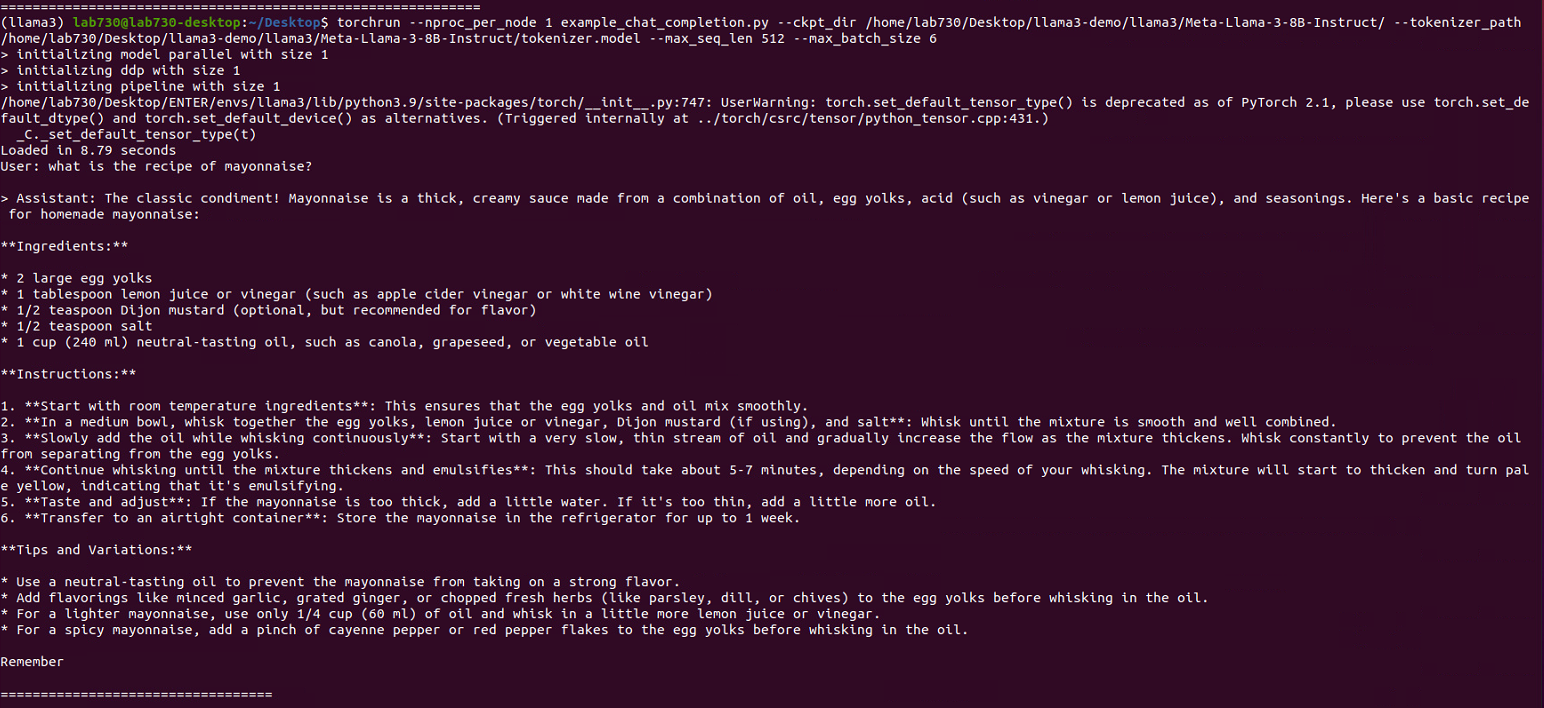
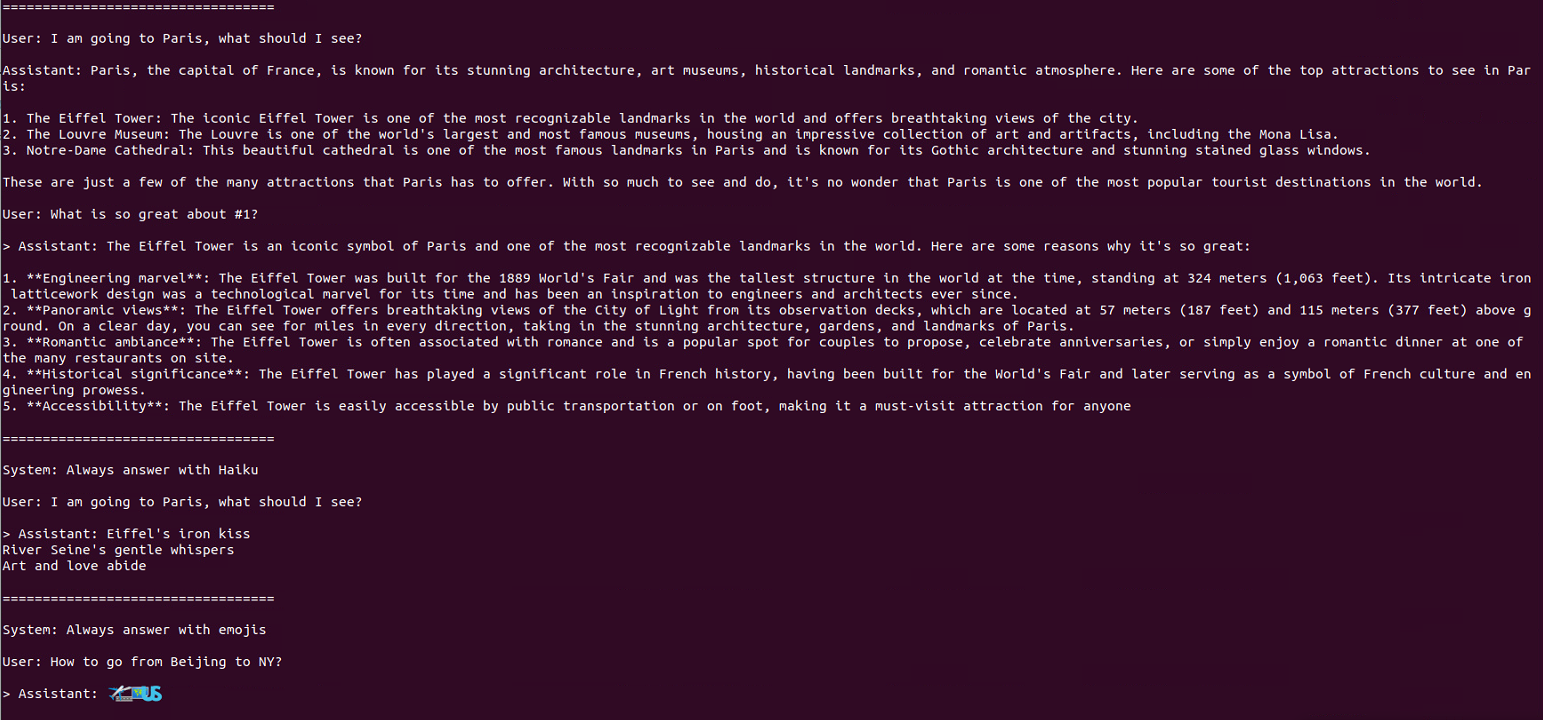
Note that in this case, we use the Meta-Llama-3-8B-Instruct/model and provide the correct tokenizer instruction under the model folder.
3.2 Fine-tune
<1> Recipes PEFT LoRA
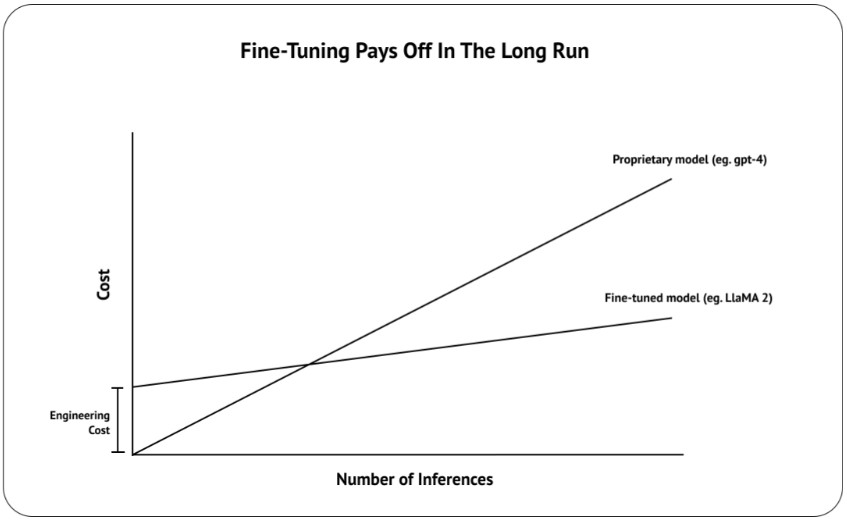
The llama-recipes repo has details on different fine-tuning (FT) alternatives supported by the provided sample scripts. In particular, it highlights the use of PEFT as the preferred FT method, as it reduces the hardware requirements and prevents catastrophic forgetting. For specific cases, full parameter FT can still be valid, and different strategies can be used to still prevent modifying the model too much. Additionally, FT can be done in single gpu or multi-gpu with FSDP.
In order to run the recipes, follow the steps below:
Create a conda environment with pytorch and additional dependencies
Install the recipes as described here:

Download the desired model from hf, either using git-lfs or using the llama download script.
With everything configured, run the following command:
python -m llama_recipes.finetuning \
-use_peft -peft_method lora -quantization \
-model_name ../llama/models_hf/8B \
-output_dir ../llama/models_ft/8B-peft \
-batch_size_training 2 -gradient_accumulation_steps 2
<2> Torchtune
Torchtune is a PyTorch-native library for fine-tuning Meta Llama family models (including Meta Llama 3). It supports an end-to-end fine-tuning lifecycle, including:
• Download model checkpoints and datasets
• Training regimens for fine-tuning Llama 3 using full fine-tuning, LoRA, and QLoRA
• Support for single GPU fine-tuning, running on consumer GPUs with 24GB VRAM
• Scale fine-tuning to multiple GPUs using PyTorch FSDP
• Log metrics and model checkpoints during training using weights and biases
• Evaluate fine-tuned models using EleutherAI’s LM evaluation tool
• Post-training quantization of fine-tuned models via TorchAO
• Interoperability with inference engines including ExecuTorch
To install torchtune, simply run the pip install command
pip install torchtune
<3> Hugging Face Llama 3 Model Weights
Follow the instructions on the Hugging Face meta-llama repository to make sure you have access to the Llama 3 model weights. Once you have confirmed you have access, you can run the following command to download the weights to your local machine. This will also download the tokenizer model and responsible use guide.
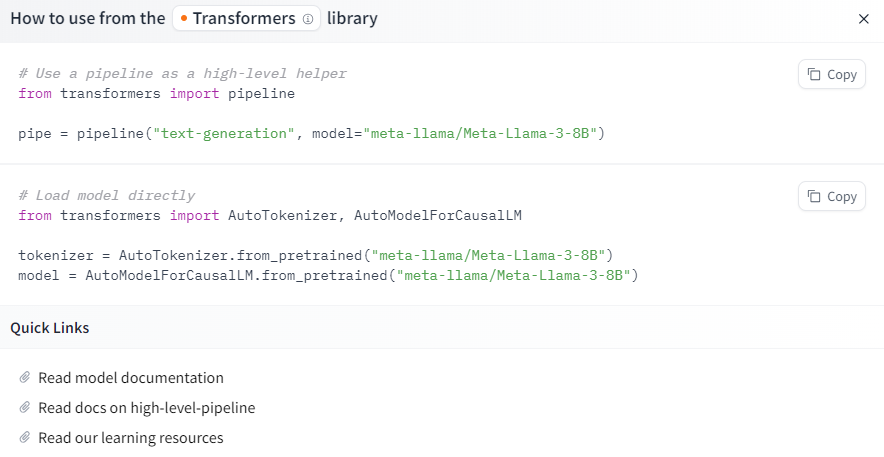
tune download meta-llama/Meta-Llama-3-8B \
-output-dir
-hf-token
Set the environment variable HF_TOKEN or pass --hf-token to the command to verify your access. You can find your token at here.
After using hugging face to download the weights locally, we write a script to run LoRA fine-tuning. The database used is meta's official IMDB dataset, and the running time is about two and a half hours.
<4> Example LoRA Script
You can use the following basic LoRA fine-tuning script template as a reference, including LoRA configuration, data preprocessing, training parameter settings, model fine-tuning, and saving related parts.
from datasets import load_dataset
from transformers import AutoModelForCausalLM, AutoTokenizer, Trainer, TrainingArguments
from peft import LoraConfig, get_peft_model
import torch

# Load the model and tokenizer
model_name = "meta-llama/Meta-Llama-3-8B"
base_model = AutoModelForCausalLM.from_pretrained(
    model_name,
    torch_dtype=torch.float32,
    device_map="auto"
)
tokenizer = AutoTokenizer.from_pretrained(model_name, trust_remote_code=True)
tokenizer.pad_token = tokenizer.eos_token
tokenizer.padding_side = "right"

# Load the dataset
dataset = load_dataset("imdb", split='train[:1%]')
eval_dataset = load_dataset("imdb", split='test[:1%]')

# Configure LoRA
lora_config = LoraConfig(
    r=16,
    lora_alpha=32,
    target_modules=["q_proj", "v_proj"],
    lora_dropout=0.1,
    bias="none"
)
model = get_peft_model(base_model, lora_config)

# Data preprocessing function
def preprocess_function(examples):
    tokenized_inputs = tokenizer(examples['text'], truncation=True, padding='max_length', max_length=512)
    tokenized_inputs["labels"] = tokenized_inputs["input_ids"].copy()
    return tokenized_inputs

tokenized_dataset = dataset.map(preprocess_function, batched=True)
tokenized_eval_dataset = eval_dataset.map(preprocess_function, batched=True)

# Set training parameters
training_args = TrainingArguments(
    output_dir="./llama3-8b-lora-finetuned",
    per_device_train_batch_size=1,
    gradient_accumulation_steps=2,
    num_train_epochs=3,
    logging_steps=10,
    save_steps=10,
    eval_strategy="steps",
    eval_steps=10,
    fp16=False,
    save_total_limit=2,
    load_best_model_at_end=True,
    metric_for_best_model="eval_loss"
)

# Creating and running the Trainer
trainer = Trainer(
    model=model,
    args=training_args,
    train_dataset=tokenized_dataset,
    eval_dataset=tokenized_eval_dataset
)

trainer.train()

# Save the fine-tuned model
model.save_pretrained("./llama3-8b-lora-finetuned")
To help the debugging and execution process go more smoothly. We can also add:
• Logging and error handling: ensure that errors can be captured during code execution and provide debugging information.
• Access token management: authentication when interacting with Hugging Face's API.
• Custom Trainer class: to meet specific training needs.
• Data preprocessing logic: convert raw data into a format acceptable to the model.
• Optimize settings for device use: optimize code execution for hardware resources.
These contents can help the code be more robust and flexible in actual applications, but when standardizing, you may choose to remove or simplify these parts to highlight the core logic.
You can view this more detailed example script.
Here are some key points to check if the LoRA fine-tuning script runs successfully:
1. Model and marker are loaded successfully: INFO:__main__: Load the model and marker.
2. Dataset is loaded successfully: INFO:__main__: Load the dataset.
3. LoRA configuration is successful: INFO:__main__: Configure LoRA.
4. Dataset preprocessing is successful: INFO:__main__: Preprocess the dataset.
5. Training is normal: Loss and evaluation loss (eval_loss) are recorded at a certain number of steps during training.
6. Model is saved successfully: INFO:__main__: Save the model.


<5> Summary and Next Steps
Based on this information, the following conclusions can be drawn:
1. The training script ran successfully: The training script was not interrupted and successfully completed all training steps.
2. The model was saved successfully: After training, the model was successfully saved.
3. The loss gradually decreased: During the training and evaluation process, the loss gradually decreased, indicating that the model is gradually learning and improving.
You can now proceed to the next step, such as:
1. Evaluate the model: Evaluate the model using an independent test set to confirm the generalization ability of the model.
2. Model inference: Use the fine-tuned model for inference tasks to verify its performance in actual applications.
3. Further optimization: If necessary, you can further adjust the hyperparameters or use more data for fine-tuning to further improve the model performance.
A possible example inference script is here, and you can improve it according to your needs.
4. GPT Programming Interface
Due to security restrictions, please connect to the IE LAN (192.168.81.x) before using this part.
Register with your CUHK account before using this feature.
Please configure the settings and interact with GPTs:
Response
5. Q&A
We always welcome any questions and suggestions from you!
6. Contact
This page is developed and maintained by Harmin Chee. If you have any questions, please feel free to contact him.

